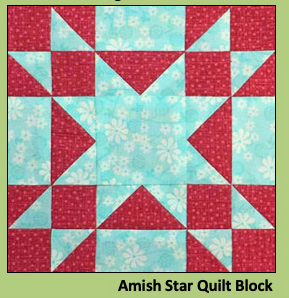
Amish Star Quilt Block
by Julie Baird
With all its patches, an Amish Star quilt block looks more complicated than it really is – it’s just a simple 9-patch. We’ll use the 8-at-a-time method to make our half square triangles. Paper piecing the Flying Geese makes for perfect units every time.
Not a fan of paper piecing? Don’t worry. A connector corners method is provided just for you.
Everything else is just cut squares and rectangles.
You CAN do it!
Let’s get STAR-ted!
General Instructions
These abbreviations are used on this page:
• SA - seam allowance
• RST - right sides together
• HST - half square triangle
• FG - Flying Geese
Label your patches as you cut them.
SA are 1/4” and pressed towards the darker fabric unless noted otherwise.
I like to starch my quilt fabric before cutting.
In my humble opinion cutting and stitching is more accurate with nicely pressed, starched fabric.
I also like being able to finger-press my seams as I go.
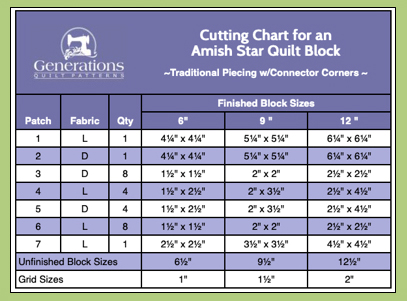
Step 1: Cut patches for an Amish Star

Amish Star Design
Sample Block:
6” finished
6½” unfinished
Two fabrics are all you’ll need to make this beauty!
The blue cutting chart is for traditional piecing and connector corners.
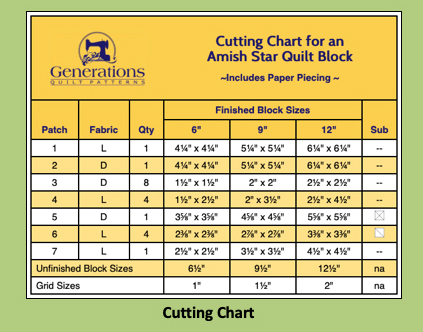
If you prefer to use paper piecing to piece your Flying Geese units, use the yellow charting.
Instructions are provided for both methods.
The best way is the one that works best for you!
Cut out all four units. A rough cut is good enough. There are no points for cutting exactly on the outside line of each. :D
My personal preference is to paper piece my Flying Geese. If it’s yours, too, use this cutting chart to cut your patches.
Step 2: Assemble the units
Corners
Make 4

We use 8-at-a-time method to make our eight HSTs. If you are making a whole quilt of this block you might want to try using triangle paper for faster piecing results.
Install your favorite 1/4” foot on your sewing machine.
On the backside of each #1, mark a diagonal line from corner to corner with a chalk pencil. Use a light touch. The mark should only be as dark as you need to see it.
Repeat for the second diagonal.
With RST layer a #1 and #2. Stitch 1/4” from both sides of the line.
Press flat to set the seams.
Now we cut the #1/#2 sewn unit into four equal squares. It’s helpful to have either a smaller (12” x 18”) or rotating mat for this step.
Use the chart below to find the center measurement that corresponds to your chosen block.
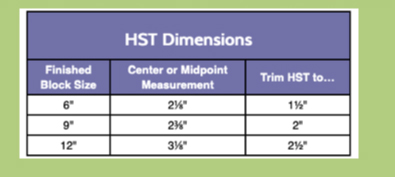
For my 6” sample, the center is 2-1/8”.
Align that line on your ruler with the edge of the sewn squares (below).
Cut through the center of the block.
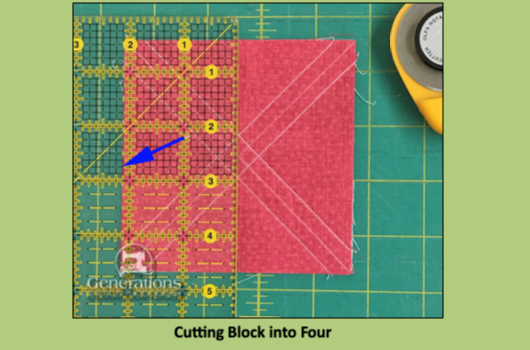
Turn the block a quarter turn and repeat the process. You’ll have four equal squares.
Cut each in half on the diagonal line to create eight HST.
Press with the SA toward the darker #2.
Referring to the chart above, find your block size and trim each HST to size.
To Complete the Corners
With RST, add a #3 to the #1 side of each HST. Make a total of 8.

SAs are pressed toward #3 to avoid bulk.
Join 2 units together. The seams nest to make matching the seam line easier. Use pins as needed.
Press this seam as shown in the photo below.
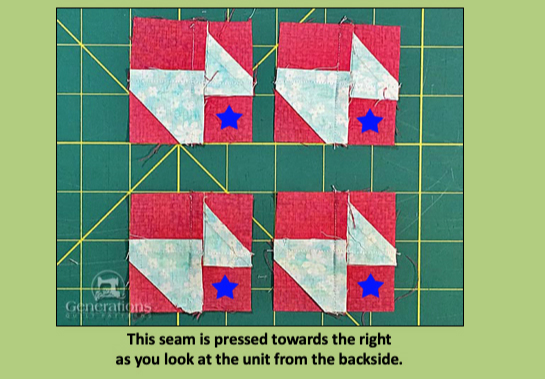
This seam is pressed towards the right
as you look at the unit from the backside.
Notice how the seams end up pressed toward the lower right red square (identified by the blue star). Later as you arrange the blocks into the Amish Star design, position that starred patch towards the center of the block. That way all your seams will nest.
After stitching, this four-patch unit measures 2½”x2½”, 3½”x3½”, and 4½”x4½” edge-to-edge for the 6”, 9” and 12” finished block sizes, respectively.
Sides

General Sewing Machine Setup for Paperpiecing
• Reduce your stitch length to 16-20 stitches per inch (1.3-1.6mm). This perforates the paper. It also stabilizes the seam as you remove the pattern.
• Reduce your machine’s speed or just plain slow down when you stitch. Sew only as fast as you can stay on the stitching lines.
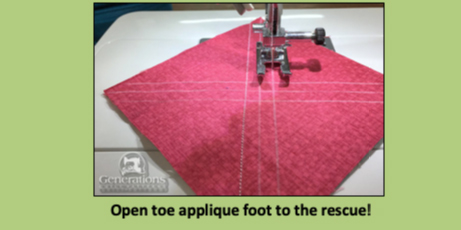
• Install an open toe applique foot if you have one (it’s easier to see where you’re stitching with one installed).
• Use a larger needle (90/14) if you have problems removing the pattern.
• As you stitch each seam, start and stop a generous 1/4” before and after the solid stitching lines. Future lines of stitching secure the ends.
After adding each patch, press the unit as it was sewn to set the seam. Then press it open. It is automatically pressed towards the last patch added.
Steam is optional and usually curls the pattern. If that bothers you, don’t use steam. Sometimes I do, sometimes I don’t. It really just depends on my mood.
I use a tiny dot of Elmer’s Washable Glue Stick to hold the Goose patch in place. Dashed placement lines(blue arrow) make positioning quick.

Used the dashed lines for placement
Align the long edge of a #6 with one short side of the #5 patch.

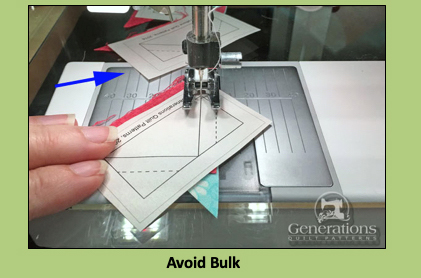
Stitch on the solid line between the two patches, starting and stopping past the outside light line that shows the outside edge of the unit.
Because this stitching line goes from outside edge to outside edge, you can chain piece your Flying Geese (below).
Press SAs toward the lighter #6 patch to avoid bulk.
Add the second #6 to the other short side in the same manner.
Press towards the lighter #6.
Trim the FG to size. I prefer to lay the 1/4” line on my ruler on the solid outline of the block to trim accurately.

After trimming and removing the paper you’ve got four perfect patches.
To complete the sides, add a #4 rectangle to the bottom side of the goose (below).
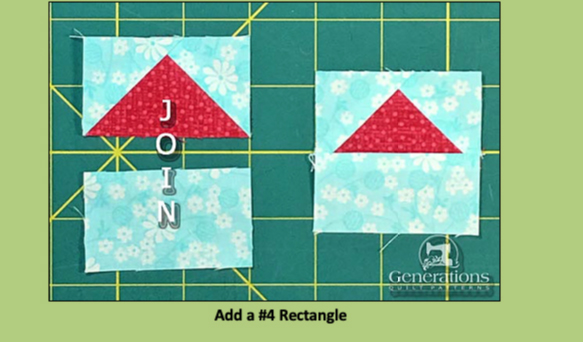
Stitch with RST.
Press the SA toward the #4 rectangle.
Repeat for a total of four.
To complete the block, remember to return your stitch length to the one you regularly use for piecing and install your favorite quarter inch presser foot.
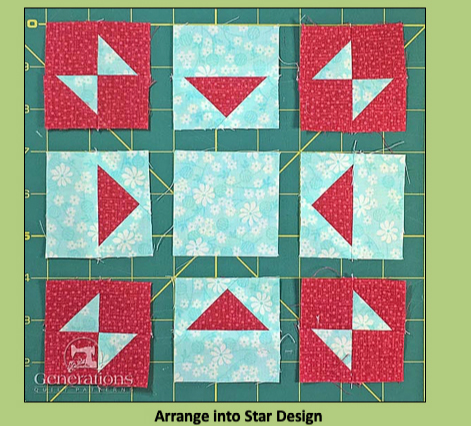
Step 3: Assemble your Amish Star quilt block
Arrange the units into the Amish Star design shown below. Solid patches are in the corners and the center sides.
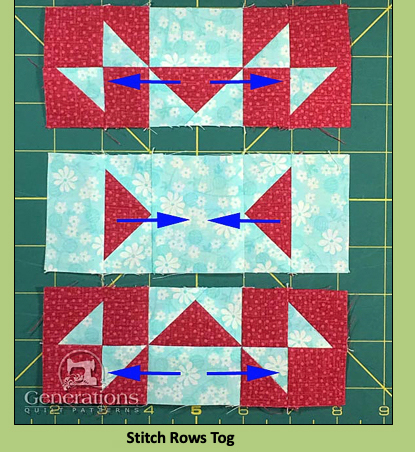
Sew the rows together, again, pinning as needed.
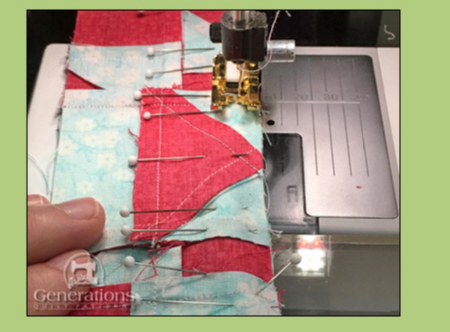
Here’s our Amish Star from the backside (without the blue stars) to show how the SA were pressed.
With RST, stitch the rows together. SA will nest, making matching so much easier.
Pin as needed.
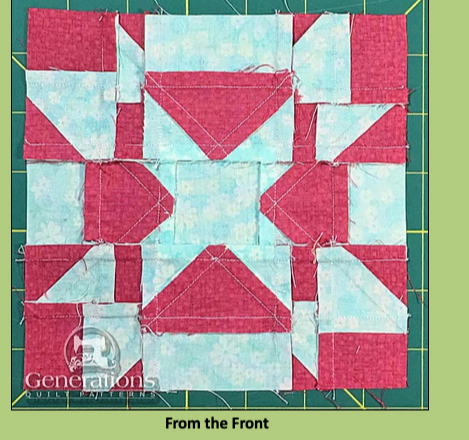
... and from the front. Our Amish Star quilt block is ready to become part of a quilt top.

|